To schedule an NBI Appointment, you need to have an active NBI Clearance Online Account. If you don’t have one, you can register an account in the NBI website.
If you don’t know how to or want to know how, you may read our article on how to do an NBI Online Registration. The article discusses all the steps that needs to be taken to complete the entire process on how to register an account in NBI Clearance website.
Go to the official NBI Clearance website and log in to your account by entering your email address and password. You will be redirected to the main dashboard of your account which displays your NBI Clearance Online Application Form.

There is a working “Forgot Password” feature for the users who already forgot their password. Clicking this link will instruct the website to send a reset link to your active email address. Clicking the reset link will activate the reset your password feature where you will assign a new password for your account.
Please note that you can’t retrieve your email address in the website if you forgot it.
You need to create a new account so you can apply for a new NBI Online Account.
If this is your first time to log in to your account, you will be asked to complete all the personal information in the application form.
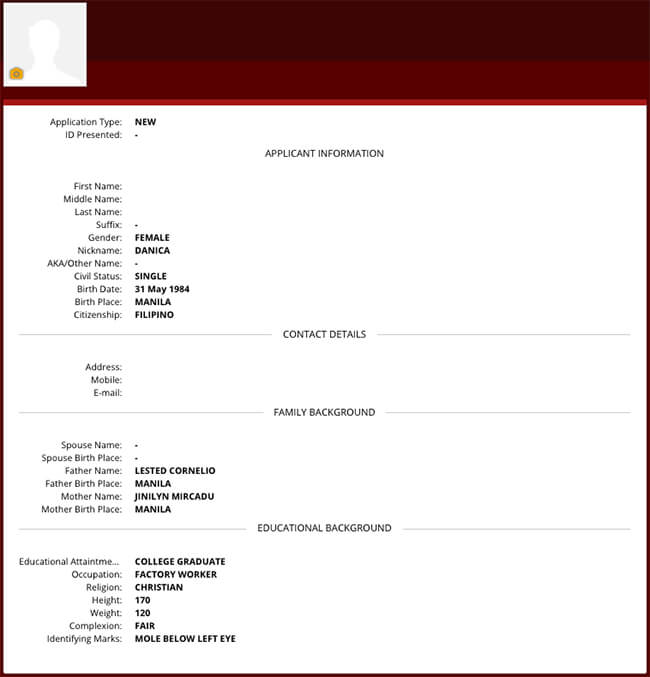
Complete all the details need such as:
- Middle Name – if not available, please type MNU which means Middle Name Unknown
- Nickname
- AKA/Other Name
- Civil Status (if you want to change it)
- Birth Place
- Citizenship
- Your Address – following this format Street / Unit / Bldg / Village
- Your Mobile Number
- Father’s Name
- Father’s Birth Place
- Mother’s Name
- Mother’s Birth Place
- Educational Attainment
- Occupation
- Religion
- Height in centimeters
- Weight in Kilograms
- Complexion
- Identifying Marks
After filling up the form, you may now proceed with the next step.
If this is not your first time to log in then I’m sure that the NBI clearance application form is already filled completely with you personal information. This time you don’t need to do anything and you may proceed to the next step.
The next step will be clicking the “APPLY FOR CLEARANCE” button.

The website will bring you to the scheduling of your NBI ONLINE APPOINTMENT page.
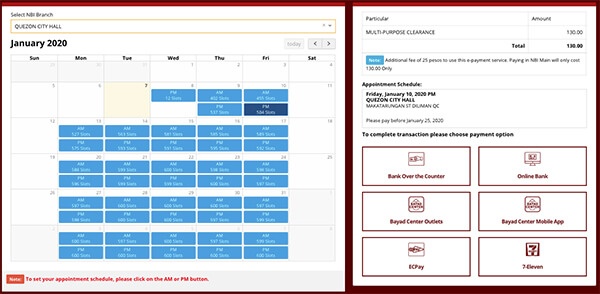
The page consist of three section. The first section is what I call the “scheduling” section where you can assign the date, time and NBI branch where you want to process your NBI Clearance.
Choose the best date and time that fits your busy schedule. I also encourage you that you choose the most convenient NBI Branch when processing your NBI clearance online.
The second section is the “summary of your schedule”. This will show you the summary of you scheduled NBI Online Appointment that you chose at the first section. The image below shows the exact example of a summary of your NBI Clearance Appointment that we have just placed.
It also shows you the amount to be paid which is P130 plus P25 (that is for the NBI Clearance Fee and E-Service Fee).
The third section is the payment option section where you can see the list of payment options available in paying your fees.
You may choose from the six (6) choices which ever is convenient to you and these are the following:
- Bank Over the Counter
- Online Banking
- Bayad Center Outlets
- Bayad Center Mobile App
- ECPay
- 7-Eleven
Once you have selected your preferred payment option. The NBI Clearance Reference Number will appear. Take note of this as this will be use in paying your fees.
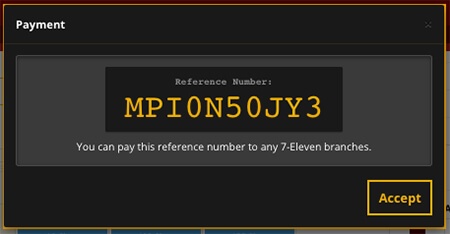
Please note that all scheduled NBI Online Appointments are not yet final unless you pay the fee.
When paying for your fees, as mentioned earlier, the one that you choose must be the most convenient payment option for you. For example, We will be choosing the 7-Eleven as our payment option because there’s a nearby store.